Exporting Barcodes Into DXF with JS-based Converter
This is a javascript version of the barcode-to-DXF converter described here.
To run the js-based converter, you don't need Visual Basic or a VBA-compatible program like Excel. You may run this code with the MSHTA utility that is available on any PC.
How to Proceed
- The example is tested for compatibility with SolidWorks/AutoCAD/ArchiCAD/Revit/NX. If you are working with any other software, try this DXF file first.
- Download and install the barcode generator.
Building the Converter
1. Make a new file with the .hta extension.
2. Paste the following code into the .hta file.
3. Run the file.
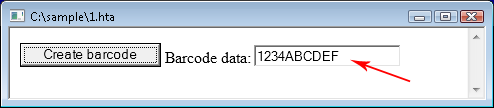
4. Type anything you want to encode in the barcode into the Barcode data field.
5. Click the Create barcode button and choose where to save the DXF file.
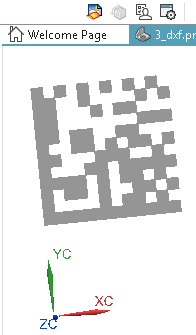
6. Open your CAD program and import the DXF file.

DXF Converter - the Code Example
<html>
<head>
<script>

arr=new Array();

function SaveDialog()
{
	dialog = new ActiveXObject('MSComDlg.CommonDialog');
	dialog.Filter='DXF|*.dxf';
	dialog.MaxFileSize=32767;
	dialog.DialogTitle='A new DXF file';
	dialog.Flags=0x800;
	dialog.ShowSave();
	name = dialog.FileName
	dialog = null;
	return name;
}

function WriteFile()
{
	s = SaveDialog();
	if(s=='')
		return false;

	fso = new ActiveXObject("Scripting.FileSystemObject");
	try
	{
		fp = fso.CreateTextFile(s, true);

		for (i = 0; i < arr.length; i++)
			fp.WriteLine(arr[i]);
	}
	catch(err)
	{
		alert(err.description);
		return false;
	}

	fp.Close();
	fp = null;
	fso = null;

	return true;
}

function write_header()
{
	arr.push(0);
	arr.push("SECTION");
	arr.push(2);
	arr.push("HEADER");

	arr.push(9);
	arr.push("$ACADVER");
	arr.push(1);
	arr.push("AC1006");

	arr.push(9);
	arr.push("$INSUNITS");
	arr.push(70);
	arr.push(4); //1 = Inches; 2 = Feet; 3 = Miles; 4 = Millimeters; 5 = Centimeters; 6 = Meters

	arr.push(0);
	arr.push("ENDSEC");

	arr.push(0);
	arr.push("SECTION");
	arr.push(2);
	arr.push("ENTITIES");
}

function write_endsec()
{
	arr.push(0);
	arr.push("ENDSEC");
	arr.push(0);
	arr.push("EOF");
}

function writexyz(x, y, corner_number)
{
	arr.push(10 + corner_number); //Group codes 10,11,12,13 are X1,X2,X3,X4 coordinates
	arr.push(x);                  //of the SOLID entity.
	arr.push(20 + corner_number); //Y1, Y2, Y3, Y4 coordinates of the SOLID entity.
	arr.push(y);
	arr.push(30 + corner_number); //Z1, Z2, Z3, Z4 are always =0
	arr.push(0);
}

function write_solid(x, y, w, h)
{
	arr.push("0");
	arr.push("SOLID");
	arr.push("8");
	arr.push("barcode");  //The layer name

	writexyz(x, y, 0);  //Four corners of the SOLID entity. 0,1,2,3 are the corner numbers.
	writexyz(x + w, y, 1);
	writexyz(x, y - h, 2);
	writexyz(x + w, y - h, 3);
}

function write_barcode(zebra, left, top, modw, modh)
{
	write_header();
	x = left;
	y = top;

	for(i=0; i<zebra.length ;i++)
	{
		z = zebra.charAt(i);
		switch(z)
		{
			case "0":
				x = x + modw;
				break;
			case "1":
				write_solid(x, y, modw, modh);
				x = x + modw;
				break;
			case "\n":
				x = left;
				y = y - modh;
		}
	}
	write_endsec();
}

function dxf_barcode()
{
	QRCODE = 25;
	DATAMATRIX = 8;

	ss = new ActiveXObject("STROKESCRIBE.StrokeScribeClass.1");
	ss.Alphabet = DATAMATRIX; //or QRCODE

	txt = document.getElementById("barcode-data");
	ss.Text = txt.value;

	if(ss.Error!=0)
	{
		alert("Error code: " + ss.Error);
		return;
	}

	zebra = ss.ZebraBits;

	ss=null;

	write_barcode(zebra, 10, 20, 30, 30); //X, Y, width, height

	if(WriteFile())
		alert("OK");
}

</script>
</head>

<body>
	<input type="button" value="Create barcode" onclick="dxf_barcode()">
	Barcode data: <input type="text" id="barcode-data">
</body>
</html>
Free version of the barcode generator provides limited functionality for zebra pattern generation. You can test the above code only on small barcodes.
Related Tutorials
- Exporting barcodes into DXF
- Barcode in AutoCAD
- Barcode in SolidWorks
- Drawing barcode in Autodesk Inventor
- Drawing barcode in Siemens NX
© 2026 StrokeScribe. All rights reserved. Use of any portion of this site constitutes acceptance of our Terms of Use and Privacy Policy. The website material may not be reproduced, except with the prior written permission.