Barcode in AutoCAD
Three methods of making barcode in AutoCAD with our barcode generator:
- Manually, with ActiveX-based version of the barcode generator. This method does not require programming, but cannot create barcodes with dynamic content.
- Programmatically, with the same ActiveX. Using this method, you can programmatically position the barcode, easily create multiple barcodes, and encode drawing properties in the barcode. This method is not suitable for CNC.
- Programmatically, with native AutoCAD polygons and class-based (invisible) instance of the barcode generator. This method requires good VBA knowledge, but ideal for CNC applications.
How to Proceed
Download and install the barcode generator.
For paper printing, use first two examples. For CNC applications, use the third example.
To run VBA code, you need to download and install the VBA enabler module - Autodesk does not distribute the VBA engine with their products since year 2014.
How to Manually Insert a Barcode in AutoCAD Using ActiveX Object
This method is usable for paper printing purposes.
1. While running AutoCAD, switch to Insert Ribbon tab, locate the Data section and click the OLE Object button:

2. Select the StrokeScribe Document from the list of available objects and press the OK button:

3. Double-click the inserted barcode object to adjust it's properties:

For more information about barcode types and settings, please visit the Documentation section.
How to Insert a Barcode in AutoCAD Using VBA
An example of how to automate the barcode placement in an easy way. AutoCAD does not accept vector formats like WMF/EMF so we will generate a barcode as a BMP picture.
Private Sub makebarcode()
 pic_path = ThisDrawing.Path & "\barcode-" & Format(Now(), "yhms") & ".bmp"

 Dim ss As StrokeScribeClass
 Set ss = CreateObject("STROKESCRIBE.StrokeScribeClass.1")
 ss.Alphabet = QRCODE  ' or =DATAMATRIX or =CODE128
 ss.Text = "123ABC"

 rc = ss.SavePicture(pic_path, BMP, ss.BitmapW * 5, ss.BitmapH * 5)
 If rc > 0 Then
   MsgBox ss.ErrorDescription
   Exit Sub
 End If

 Dim insertionPoint(0 To 2) As Double
 insertionPoint(0) = 0
 insertionPoint(1) = 0
 insertionPoint(2) = 0

 Dim rasterObj As AcadRasterImage
 Set rasterObj = ThisDrawing.ModelSpace.AddRaster(pic_path, insertionPoint, 1#, 0)

 rasterObj.color = acRed
 rasterObj.Update
End Sub
Open VBA window with Tools->Macro->Visual Basic Editor, select This Drawing in the VBA project tree and paste the code into the VBA editor. Press F5 in the makebarcode() body to run the code.

You need to add a reference to StrokeScribe Class into your VBA project to run the code.
Please note that the AddRaster() function locks the bmp file. To create multiple barcodes, you need to use different file names for barcode images.
To encode a document property (File->Drawing Properties->Custom) in the barcode, modify the code in the following way:
ss.Alphabet = DATAMATRIX ' or =QRCODE
Dim prop As String
SummaryInfo.GetCustomByKey "TEST", prop
ss.Text = prop
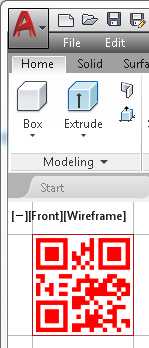
Drawing a Barcode Using Polygons
This method is useful in CNC applications.

The VBA code creates a 2D barcode in vector format. The barcode consists only of solid polygons, i.e. no raster or EMF pictures or ActiveX objects are used.
Private Sub draw_solid(x As Integer, y As Integer, w As Integer, h As Integer)
    Dim point1(0 To 2) As Double
    Dim point2(0 To 2) As Double
    Dim point3(0 To 2) As Double
    Dim point4(0 To 2) As Double

    point1(0) = x
    point1(1) = y
    point1(2) = 0

    point2(0) = x + w
    point2(1) = y
    point2(2) = 0

    point3(0) = x
    point3(1) = y - h
    point3(2) = 0

    point4(0) = x + w
    point4(1) = y - h
    point4(2) = 0

    ModelSpace.AddSolid point1, point2, point3, point4
End Sub

Private Sub draw_barcode(zebra As String, _
                  left As Integer, top As Integer, _
                  modw As Integer, modh As Integer)

    Dim x As Integer
    Dim y As Integer
    x = left
    y = top
    i = 1
    Do
       z = Mid(zebra, i, 1)
       Select Case z
       Case ""
          Exit Do
       Case "0"
          x = x + modw ' We ignore white modules of the barcode
       Case "1"
          draw_solid x, y, modw, modh ' Creates a solid poly for each black barcode module
          x = x + modw
       Case Chr(10)
          x = left
          y = y - modh
       End Select
       i = i + 1
    Loop
End Sub

Sub make_barcode()
  Dim ss As StrokeScribeClass
  Set ss = CreateObject("STROKESCRIBE.StrokeScribeClass.1")

  ss.Alphabet = QRCODE ' or =DATAMATRIX or =AZTEC
  ss.Text = "123ABC"

  If ss.Error Then
    MsgBox ss.ErrorDescription
  End If

  Dim zebra As String
  zebra = ss.ZebraBits ' Demo version of StrokeScribe Class version => see the notes below

  draw_barcode zebra, 10, 30, 1, 1 ' X, Y, module width, module height
End Sub
You need to add a reference to StrokeScribe Class to run the code.
If you want to draw a barcode using circles instead of rectangles, replace the draw_solid() code with the following:
Dim point(0 To 2) As Double
point(0) = x
point(1) = y
point(2) = 0
ModelSpace.AddCircle point, 0.5
Testing the Above Code with Demo Version of StrokeScribe Class
Demo version of the barcode generator provides limited functionality for zebra pattern generation. You can test the above code on small barcodes or use the pre-built zebra string shown below.
Pass this text string as the first parameter of the draw_barcode() to produce a Data Matrix barcode:
zebra = _
"10101010101010101010" & Chr(10) & _
"10100110111110100111" & Chr(10) & _
"10110010111000001100" & Chr(10) & _
"10011001011011110111" & Chr(10) & _
"11101001111100101100" & Chr(10) & _
"10000110010111001001" & Chr(10) & _
"11000010011001101010" & Chr(10) & _
"11110101001101000101" & Chr(10) & _
"11110000101111001010" & Chr(10) & _
"11011000111000110101" & Chr(10) & _
"10111110111010110010" & Chr(10) & _
"10101110101111000011" & Chr(10) & _
"10101101000000100100" & Chr(10) & _
"11000101100000101011" & Chr(10) & _
"11001010000110000110" & Chr(10) & _
"11000010001111101011" & Chr(10) & _
"11000011000110110000" & Chr(10) & _
"11111111100100010101" & Chr(10) & _
"11010100010010001010" & Chr(10) & _
"11111111111111111111" & Chr(10)

draw_barcode zebra, 10, 30, 1, 1
For more pre-built linear and 2D barcode zebra patterns, go here.
Related Tutorials
© 2026 StrokeScribe. All rights reserved. Use of any portion of this site constitutes acceptance of our Terms of Use and Privacy Policy. The website material may not be reproduced, except with the prior written permission.