Drawing CNC-friendly barcodes in Autodesk Inventor
Some examples, how to place a barcode in Inventor manually or create multiple barcodes with VBA and StrokeScribe barcode generator both, in raster and vector formats.
Raster barcode images are easy to make. Polygon-based barcodes are scalable and CNC friendly.
How to Proceed
- Download and install the barcode generator;
- Create an empty drawing in Inventor;
- Use one of the following examples to insert a barcode.
Free version of the barcode generator creates only small-sized barcodes.
How to Manually Place a Barcode in Inventor
1. On the Manage tab, look for the Insert Object button:

2. In the Insert Object dialog, select StrokeScribe Document:

3. Left-click the mouse anywhere on the drawing to insert the barcode object. Use the mouse to resize the barcode.
4. Double-click the barcode object. Inventor will open a small pop-up window with the same barcode. Double-click the window to edit the barcode properties.
5. Close the pop-up window to apply modifications to the barcode.
Using StrokeScribe Class and VBA to Create Barcode Image
This example shows how to insert a barcode picture in JPG format into Inventor drawing using VBA and StrokeScribe barcode generator.
1. Press Alt+F11 to open VBA Window.
2. Double-click ThisDocument in the project tree to open the code editor.
3. Paste the following code into the editor.
4. Add a reference to StrokeScribe Class.
5. Place the cursor into the MakeBarcode() body and press F5
Sub MakeBarcode()
  tmp = Environ("TEMP")
  pic_path = tmp & "\barcode.jpg"

  Dim ssc As StrokeScribeClass ' Tools->References->StrokeScribe Class
  Set ssc = CreateObject("STROKESCRIBE.StrokeScribeClass.1")
  ssc.Alphabet = QRCODE
  ssc.Text = "123ABCD"

  s = 20 ' The bitmap scale of 20 produces 20x20 pixel barcode modules
  rc = ssc.SavePicture(pic_path, JPG, ssc.BitmapW * s, ssc.BitmapH * s)
  If rc > 0 Then
    MsgBox ssc.ErrorDescription
    Exit Sub
  End If

  InsertImage pic_path, 10, 40 '(10,40) = image position in the Title block
  Kill pic_path
End Sub

Sub InsertImage(pic_paath, x, y)
  Set tbd = ThisApplication.ActiveDocument.ActiveSheet.TitleBlock.Definition

  Dim sk As DrawingSketch
  Call tbd.Edit(sk)

  Set pt = ThisApplication.TransientGeometry.CreatePoint2d(x, y)

  Dim img As SketchImage
  Set img = sk.SketchImages.Add(pic_paath, pt, False)

  tbd.ExitEdit
End Sub

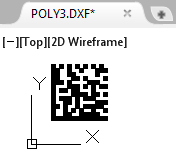
Drawing Barcodes in Inventor Using Solid Polygons
An example how to create a barcode using solid polygons. This method can be used in CNC applications.
10101010101010
11001001000111
11001100000100
11000110100001
11101000011100
10001110101011
10110110001000
10000111101101
10111010111000
10011010000111
11010010111110
10010101001001
10011001111100
11111111111111
On the left is a sample output of the ZebraBits property provided by StrokeScribe barcode generator.
The ones in the bit string correspond to black modules, zeros - to white modules. The picture on the right is how the barcode looks like.
The code below draws a barcode using native sketch polygons.
1. Press Alt+F11 to open VBA Window.
2. Double-click ThisDocument in the project tree to open the code editor.
3. Paste the following code into the editor.
4. Add a reference to StrokeScribe Class.
5. Place the cursor into the MakeBarcode() body and press F5
Sub MakeBarcode()
  Dim ss As StrokeScribeClass ' Tools->References->StrokeScribe Class
  Set ss = CreateObject("STROKESCRIBE.StrokeScribeClass.1")
  ss.Alphabet = QRCODE
  ss.Text = "123ABC"

  Dim zebra As String
  zebra = ss.ZebraBits ' Free version of StrokeScribe Class => see the notes below

  draw_barcode zebra, 10, 30, 1, 1 ' X, Y, module width, module height
End Sub


Private Sub draw_barcode(zebra As String, _
                  left As Integer, top As Integer, _
                  modw As Integer, modh As Integer)

  Dim app As Inventor.Application
  Set app = ThisApplication

  Dim sk As DrawingSketch
  Set sk = app.ActiveDocument.ActiveSheet.Sketches.Add()
  sk.Edit

  Dim c As Inventor.Color
  Set c = app.TransientObjects.CreateColor(0, 0, 0)

  ThisApplication.ScreenUpdating = False

  Dim x As Integer
  Dim y As Integer
  x = left
  y = top
  i = 1
  Do
     Z = Mid(zebra, i, 1)
     Select Case Z
     Case ""
        Exit Do
     Case "0"          'A white module of the barcode
        x = x + modw
     Case "1"           'A black module
        Set pt = app.TransientGeometry.CreatePoint2d(x, y)
        Set pt2 = app.TransientGeometry.CreatePoint2d(x + modw, y + modh)
        sk.SketchLines.AddAsTwoPointRectangle pt, pt2
        x = x + modw
     Case Chr(10)
        x = left
        y = y - modh
     End Select
       i = i + 1
  Loop

  Dim pr As Profile
  Set pr = sk.Profiles.AddForSolid
  sk.SketchFillRegions.Add pr, c

  app.ScreenUpdating = True

  sk.ExitEdit
End Sub
Related Tutorials
© 2026 StrokeScribe. All rights reserved. Use of any portion of this site constitutes acceptance of our Terms of Use and Privacy Policy. The website material may not be reproduced, except with the prior written permission.