
PDF417 in Microsoft Excel
Examples how to make PDF417 barcodes in Excel without or with minimal programming effort.
Setup
- Download and install the barcode generator.
- The barcode generator is compatible with all Windows versions starting from Windows XP and supports all Office versions, excluding online version of Office 365.
Placing PDF417 in Excel Using Office Ribbon Add-in
If you need to insert a single PDF417 barcode, use our Ribbon Add-in. It is just a helper to insert Active Document or ActiveX instances of the barcode generator in easy way. To simply insert a static barcode, choose the "Active Document". To make a dynamic PDF417, use the "ActiveX" button and link the barcode to a cell.
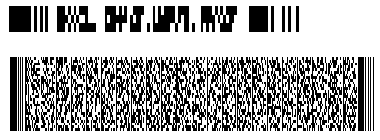
The picture below shows how to insert a PDF417 barcode:

After inserting, double-click the barcode to edit it's properties. On the General tab, enter a text to encode in the barcode. On the Code specific tab, you can fix the number of rows and columns and select the desired error correction level.
See more information about barcode properties in the PDF417 Customization section.
An alternative to this method is to use cell formula - see in the related tutorials. It requires VBA, but we have a step-by-step guide for non-VBA users.
Placing PDF417 in Excel Using Active Document
An example how to use the Active Document version of StrokeScribe barcode generator to create and customize PDF417 in Excel.
The Active Document is easy to insert but provides less customizations. If you need to create a dynamic barcode by linking the object to a cell, use the ActiveX-based method.
1. On the Insert tab on the Ribbon, click Object.
2. Look for the StrokeScribe Document in the dialog:

3. Right-click the barcode object, select StrokeScribe Control->Properties from the context menu.
- Go to the General tab in the barcode properties dialog;
- Set Alphabet = PDF417;
- Type any text in the Text field.

National characters/UTF8
If you need to encode non-Latin characters in UTF8, check the Code Page property on the General tab. By default, the barcode generator uses the system code page (can be modified through the Control Panel) and encodes these characters in binary data compaction mode.
How to encode ASCII codes in PDF417
To encode ASCII control characters in the barcode, check the Process tilde flag and paste your codes in hexadecimal or decimal form: ~x0D~x0A (ASCII CR LF) or ~d009 (ASCII TAB).
PDF417 Customization
1. On the General tab, use the Rotation field to make vertically oriented barcodes.
2. The Show text field is not applicable to PDF417 - the barcode generator does not print human-readable label below 2D barcodes.
3. The Enable flag allows users to double-click the barcode to display the properties dialog.
4. Switch to the Code-specific 2 tab in the barcode properties dialog.
Here, you can set the error protection level and fix the number of rows/columns. More properties are available in the ActiveX/Class/DLL versions of the barcode generator.
The number of rows must be in the range of [1..90]. The number of data columns must be in the range of [1..30]. There is no need to specify them both at the same time.

If the error protection level is set to -1, the barcode genertor will automatically choose optimal error correction level. The value of 0 forces to use the weakest error correction and produces a small barcode. The value of 8 gives the best data protection but increases the barcode size.
Here is how compare barcodes with the same data, but with different error protection levels:
Compact/truncated PDF417
To create a truncated version of a PDF417 barcode, set the CompactPDF417 property as shown below. This option is available only when creating barcodes programmatically or through the ActiveX properties sheet:
StrokeScribe1.CompactPDF417 = True
A Compact PDF417 symbol doesn't have a sync pattern on the right side as shown below. Use this barcode type only on clean surfaces.

Placing PDF417 Barcode in Excel Using ActiveX
The ActiveX-based barcode generation may require some programming but allows to produce PDF417 in bulk quantities.
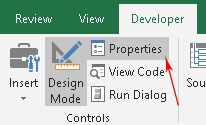
1. Switch to the Developer tab on the Excel Ribbon and click Insert->More Controls as shown below.
2. Select StrokeScribe Control from the list of available objects and press OK:

3. Click anywhere on the sheet to insert the barcode object.
4. Activate the Design Mode button on the Developer tab.
4.1. Right-click the barcode object, select Properties or activate the Properties button on the Ribbon:
5. Use the property list to customize your barcode. To create a PDF417, modify the following properties:

When encoding non-latin characters in the barcode, make sure the receiving party is able to decode your data. Some applications (postal, banking) require the character encoding to be done using national code page, but it also may be required to encode the text in UTF8.
To encode the text in UTF8, set the CodePage property to 65001.
By default, the national code page is applied automatically based on your PC's default locale setting and the binary encoding algorithm is used to store the text.
Customizing the ActiveX-based PDF417
The PDF417ModuleAspectRatio property allows to set the height:width ratio of PDF417 modules. The default vaue is 3 (i.e. 3:1); The higher values (4:1 or 5:1) are recommended for barcodes with weak error correction levels and for for use on dirty surfaces.
This is how a PDF417 barcode with 5:1 module aspect ratio looks like:

Linking PDF417 to a Cell
To automatically update the barcode when a cell content changes, use the linked cell technique.
PDF417 Customization with VBA
1. Press Alt+F11 to open VBA window. Double-click the current sheet name in the VBA project tree:

2. Paste the following code into the VBA editor:
Sub CreateBarcode()
  StrokeScribe1.Alphabet = PDF417
  StrokeScribe1.Text = "123ABCD" ' Any text to encode in the barcode

  ' Optional PDF417 parameters:
  StrokeScribe1.Rotation = 90
  StrokeScribe1.PDF417ErrLevel = 3  ' Optional error correction level
  StrokeScribe1.CompactPDF417 = 1 ' Creates a Compact PDF417 barcode
  StrokeScribe1.PDF417Cols = 3 ' Fixed number of the data columns
End Sub
3. Place the caret into the Sub body, press F5 to run the code and switch back to the Excel window to enjoy the barcode.
To encode data from a cell, use the following code:
StrokeScribe1.Text = Range("A1")
To encode a byte array, use the following code:
StrokeScribe1.CodePage = -1 ' Disables code page translation
Dim b(1 To 3) As Byte
b(1) = &H1  ' An array of byte codes: 1, 2, 3
b(2) = &H2
b(3) = &H3
StrokeScribe1.Text = b
Related Tutorials
- Making PDF417 in Excel with DLL library
- Making PDF417 in Excel with Formula
- Barcode in Microsoft Excel
FAQ: Creating PDF417 barcodes in Excel
Q: Can I use Excel to create a batch of PDF417?
You can create a batch PDF417 by using our formula-based example and COM-version of our barcode generator. This feature allows to generate barcodes for multiple rows or columns at once. Look for the formula/DLL examples in the Related Tutorials.
Q: Is there a limit to the size or number of barcodes I can create in Excel?
There is no strict limit imposed by Excel. But, if you are trying to ues ActiveX objects to create PDF417 barcodes, we do not recommend to create more than 1000 objects.
For bulk PDF417 generation, use our formula/DLL examples - they output barcodes as vector pictures or use fonts. These barcode rendering methods are memory-efficient.
Q: Can I create dynamic PDF417 barcodes that update automatically when data in Excel changes?
Use our formula-based example to create PDF417 barcodes, or link an ActiveX instance of the barcode generator to a cell using the LinkedCell property.
Q: How many characters or binary bytes can be stored in PDF417?
According to the ISO specification:
| Data encoding mode | Maximum barcode capacity |
| Text | 1850 characters |
| Byte | 1108 bytes |
| Numeric | 2710 digits |
These values are lower at higher error correction levels.
Q: Why my PDF417 is not scanning properly?
Check the following:
- Resolution: The barcode should not be too small. Ensure it’s large enough for scanners to recognize. For potentially dirty surfaces, use strong error correction levels.
- Content: Ensure the data encoded in the PDF417 is valid for your application (postal/banking barcodes).
- Placement: Avoid placing the barcode the edges of the page or too close to the surrounding content.
© 2026 StrokeScribe. All rights reserved. Use of any portion of this site constitutes acceptance of our Terms of Use and Privacy Policy. The website material may not be reproduced, except with the prior written permission.