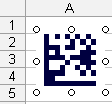
Making Data Matrix Barcode in Microsoft Excel
An example how to use the ActiveX-based version of StrokeScribe barcode generator to insert a single Data Matrix barcode in Excel. Most of the examples do not require any programming.
If you need a non-ActiveX method or want to insert barcodes in bulk quantities, see the related tutorials.
Requirements
- Download and install the barcode generator.
About Data Matrix barcode generation in Excel
Data Matrix barcodes are valuable in Excel because they allow efficient tracking, management, and updating of data.
By encoding complex information in a compact, machine-readable format, these barcodes reduce human error and improve data accuracy. Excel users can link barcodes to detailed records, making it easier to access and update product or asset information quickly.
The ability to store large amounts of data in a small space makes Data Matrix codes especially useful for inventory management.
Unlike traditional barcodes, they can encode alphanumeric characters, serial numbers, and more, which is perfect for managing detailed product or inventory information in Excel.
Scanning these codes instantly retrieves related data, eliminating manual data entry and improving efficiency.
Additionally, Data Matrix barcodes help reduce input errors by allowing users to scan barcodes instead of typing information manually.
This ensures more accurate and reliable data in Excel, particularly for industries like retail, warehousing, or supply chain management, where precise data is essential. Overall, integrating barcodes in Excel offers a scalable, cost-effective way to manage large datasets and automate workflows.
Placing Data Matrix Barcode in Excel Using Active Document
1. Switch to the Insert tab on the Excel Ribbon and click Object.
2. Look for the StrokeScribe Document in the list of available objects:

3. Right-click the barcode object, select StrokeScribe Control->Properties from the context menu.
- Go to the General tab in the barcode properties dialog;
- Set Alphabet = DATAMATRIX;
- Type any text in the Text field.

Data Matrix Barcode Customization
There are no many properties to configure. You can set the quiet zone size around the Data Matrix object and choose a barcode color.
Switch to the Code-specific 2 tab in the barcode properties dialog.

Placing Data Matrix Barcode in Excel Using ActiveX
1. Switch to the Developer tab on the Excel Ribbon and click Insert->More Controls as shown below.
2. Select StrokeScribe Control from the list of available objects and press OK:

3. Click anywhere on the worksheet to insert the barcode object.
4. Activate the Design Mode button on the Developer tab.
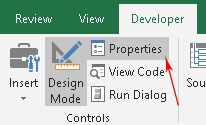
4.1. Right-click the barcode object, select Properties or activate the Properties button on the Ribbon:

5. Use the property list to customize your barcode. To create a Data Matix barcode, modify the following properties:

Linking the Data Matrix Barcode to a Cell
To automatically update the barcode when a cell content changes, use the linked cell technique.
Data Matrix Customization with VBA
An example how to modify the barcode properties from VBA. We will modify the barcode that is already inserted into the worksheet as described above.
1. Press Alt+F11 to open VBA window. Double-click the current worksheet name in the VBA project tree:

2. Paste the following code into the VBA editor:
Sub CreateDataMatrix()
  StrokeScribe1.Alphabet = DATAMATRIX  ' Creating a Data Matrix barcode
  StrokeScribe1.Text = "ANY TEXT"    ' A text you want to encode in the barcode

  ' Optional parameters:
  StrokeScribe1.QuietZone2D = 1
  StrokeScribe1.FontColor = RGB(0, 0, 255)
  StrokeScribe1.Rotation = 90
End Sub
3. Place the caret into the CreateDataMatrix Sub body, press F5 to run the code, and switch back to the Excel window to see the barcode.
To encode data from a cell, use the following code:
StrokeScribe1.Text = Range("A1")
To encode a byte array, use the following code:
StrokeScribe1.CodePage = -1
Dim b(1 To 3) As Byte
b(1) = &H1
b(2) = &H2
b(3) = &H3
StrokeScribe1.Text = b