Barcode Printing in Visual Basic 6
In this example, we will show how to directly print barcode labels on laser and thermal printers using the Printer object the ActiveX-based version of StrokeScribe barcode generator.
Requirements
- Download and install the barcode generator.
Method #1. Placing the Barcode ActiveX on a Form
1. From the Visual Basic menu, execute Project->Components:

2. In the Components dialog, switch to the Controls tab and look for the StrokeScribe ActiveX control module.

3. Click the barcode icon on the Toolbox panel (if you don't see the Toolbox, execute View->Toolbox from the VB6 menu).

4. Click and drag the mouse on the form to insert a barcode object.
Your barcode will look like shown on the picture:

How to Modify Barcode Properties Using Standard VB6 Property Sheet

Select the barcode by right-clicking the mouse on it. Press F4 to show the Properties window.
The properties that will interest you at the first time are:
Method #2. Printing Barcode Labels
This example is optimized to print barcodes on thermal printers but you can use it with laser printers as well. No third-party reporting tools needed to try this code.
Set barcode = StrokeScribe1  ' Place the barcode generator ActiveX on a form as shown above
barcode.Alphabet = CODE128

For i = 1 To 1 ' Change this to print multiple labels at once
    barcode.Text = "12345678901" ' Change this to encode your own text in the barcode

    Printer.ScaleMode = vbMillimeters

    ' This shows how to draw a text string on the label
    Printer.FontSize = 8
    Printer.FontName = "Arial"

    Printer.CurrentX = 0 ' The text string is positioned at (0, 1)mm measured from the left top corner of the label
    Printer.CurrentY = 1
    Printer.Print "A CODE 128 label"


    pw = Printer.ScaleWidth ' The width and height of the label (in millimeters)
    ph = Printer.ScaleHeight

    Printer.Line (0, 0)-(pw, 0) ' Draws a line at the top of the label

    bar_w = barcode.BitmapW ' The width of the barcode image (in pixels)
    bar_h = 80
    Set pic = barcode.GetPictureHandle(BMP, bar_w, bar_h)

    If barcode.Error > 0 Then
        Printer.KillDoc
        MsgBox barcode.ErrorDescription
        Exit Sub
    End If


    Printer.CurrentX = 10 ' The barcode is positioned at (10, 10)mm measured from the left top corner of the label
    Printer.CurrentY = 10
    Printer.ScaleMode = vbPixels ' Because the PaintPicture() requires us to specify the bitmap dimensions, we switch to pixels
    Printer.PaintPicture pic, Printer.CurrentX, Printer.CurrentY, bar_w, bar_h

    Printer.NewPage ' Omit this call if printing only one label per document
Next

Printer.EndDoc
Some Notes on the Code
The barcode.BitmapW property always returns the minimum amount of pixels that allow to display the barcode. You may multiply it to any value to make a wider barcode.
For linear barcodes (CODE 128, EAN-13), you may choose any value for the height.
For 2D barcodes (QR Code, Data Matrix), you must specify the same values for width and height. Do not try to print 1x1 pixel barcodes, scanners usually don't recognize them.
Below is a sample printout made on a receipt printer, 80mm wide paper. Click the picture to see it in high resolution (700Kb).

The QR Code shown on the printout is created using the following settings:
barcode.Alphabet = QRCODE

'2x2 pixel barcode modules - the smallest readable barcode image
bar_w = barcode.BitmapW * 2
bar_h = bar_w  '2D barcodes are always square
We used these settings to print a large EAN-13:
barcode.Alphabet = EAN13

'2-pixel-wide barcode bars (but it's OK to use one-pixel bars too if you need a smaller barcode)
bar_w = barcode.BitmapW * 2
bar_h = 80
Use these settings to print a Data Matrix barcode:
barcode.Alphabet = DATAMATRIX

' You can multiply the BitmapW to 2,3,4,5 to create large barcodes
bar_w = barcode.BitmapW * 2
bar_h = bar_w  '2D barcodes are always square
A code to create UPC-A barcodes. The sample printout is made using BitmapW*2:
barcode.Alphabet = UPCA

bar_w = barcode.BitmapW * 2
bar_h = 150
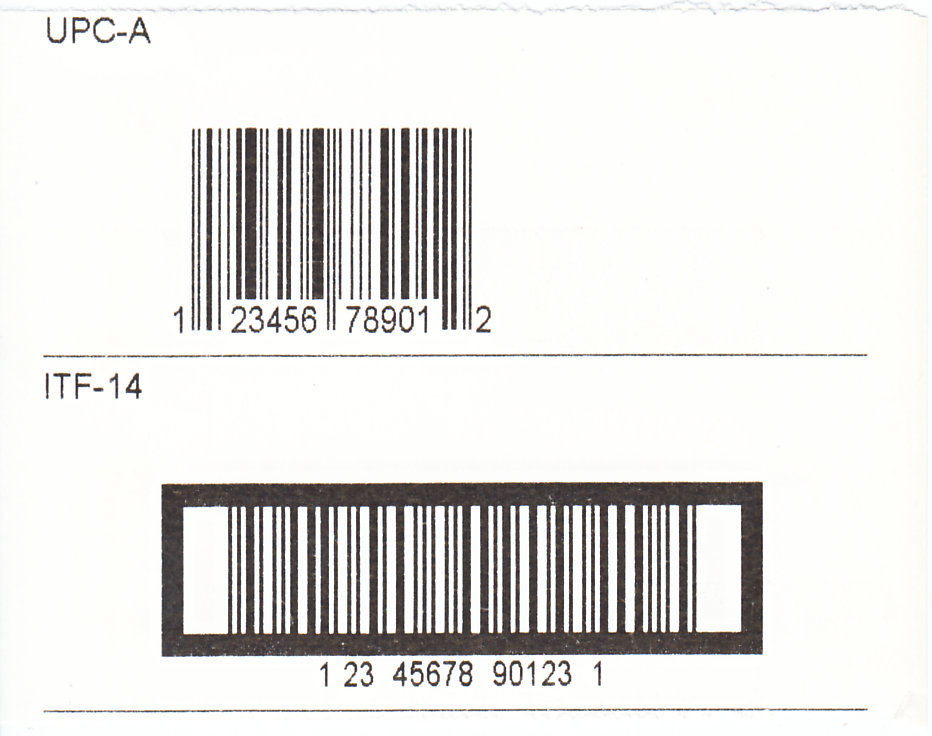
ITF-14 barcodes are typically printed large as possible. The barcode shown on the right has 3-pixel-wide bars:
barcode.Alphabet = ITF14
barcode.ITF14BearerBox = True

bar_w = barcode.BitmapW * 3
bar_h = 150
An example of GS1-128 (formerly EAN-128) barcode. Here we encode a container gross weight, a production date and a batch number.
For the list of supported GS1 AIs, go here.
barcode.Alphabet = EAN128

'(330Y) = Container Gross Weight, Kg
container_gross_weight = "3302" & "034567"  '345.67Kg

'(11) = Production Date, YYMMDD
production_date = "11" & "991231"  '31-DEC-1999

'(10) = Batch Number
batch_number = "10" & "A1B2C3"

barcode.Text = batch_number & Chr(29) & container_gross_weight & production_date

bar_w = barcode.BitmapW
bar_h = bar_w / 2
In the Container Gross Weight, Y means the decimal point position.
The date encoding must always use the YYMMDD format. Neither YYYYMMDD nor DDMMYY are allowed by the GS1 specification.
To terminate variable-length values like Batch Number (AI 10), Lot Number (AI 32) or Serial Number (AI 21), use the ASCII GS control character with the decimal code 29.
Method #3. How to Create an Excel Worksheet with Barcode from VB6
A basic example how to run Excel from VB6 and put a barcode on a worksheet.
How to Prepare the Project
Go to the Project->References in the VB6 menu:

In the References dialog, look for the StrokeScribe ActiveX control module and for the Microsoft Excel Object Library.

Your Excel Library version may differ from the shown on the picture:
- For Office XP, look for the Microsoft Excel 10.0 Object Library;
- For Office 2007, look for the Microsoft Excel 12.0 Object Library;
- For Office 2010, look for the Microsoft Excel 14.0 Object Library;
- For Office 2016, look for the Microsoft Excel 16.0 Object Library;
The Code Example
Copy this code into your project. The code will create a 2x2cm QR Code on the worksheet.
Dim ex As Excel.Application
Set ex = CreateObject("Excel.Application")
ex.Visible = True

Dim wbk As Excel.Workbook
Set wbk = ex.Workbooks.Add

Dim wsh As Excel.Worksheet
Set wsh = wbk.Worksheets(1)

Dim shp As Excel.Shape
Set shp = wsh.Shapes.AddOLEObject("STROKESCRIBE.StrokeScribeCtrl.1")

shp.LockAspectRatio = msoFalse
shp.Width = ex.InchesToPoints(1)
shp.Height = ex.InchesToPoints(1)
shp.Left = ex.InchesToPoints(1)
shp.Top = ex.InchesToPoints(1)

Dim ss As StrokeScribe
Set ss = shp.OLEFormat.Object.Object
ss.Alphabet = QRCODE
ss.Text = "1234abc"
Method #4. How to Create a Word Document with Barcode from VB6
A basic example of running Word from VB6 and putting a barcode into a document.
How to Prepare the Project
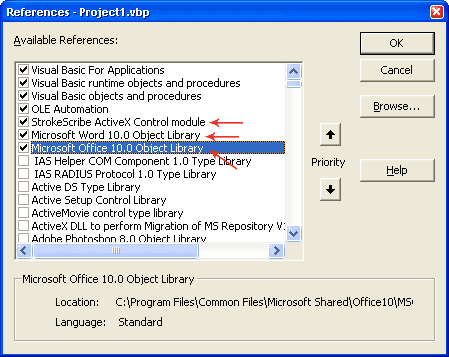
Go to the Project->References in the VB6 menu:
In the References dialog, look for the StrokeScribe ActiveX control module, Microsoft Word Object Library and for Microsoft Office Object Library.
Your Office and Word library versions may differ from the shown on the picture.
The Code Example
Copy this code into your project. The code will create a 3cm wide CODE 128 at the bottom-right corner of the first page of the Word document.
Dim w As Word.Application
Set w = CreateObject("Word.Application")
w.Visible = True

Dim doc As Word.Document
Set doc = w.Documents.Add
' or  Set doc = w.Documents.Open("example.doc")

With doc.PageSetup
   doc_w = .PageWidth - .RightMargin - .LeftMargin
   doc_h = .PageHeight - .TopMargin - .BottomMargin
End With

Dim r As Range
Set r = doc.GoTo(wdGoToPage, wdGoToAbsolute, 1)

Dim shp As Word.Shape
Set shp = doc.Shapes.AddOLEObject("STROKESCRIBE.StrokeScribeCtrl.1", Anchor:=r)

shp.LockAspectRatio = msoFalse
shp.Width = w.CentimetersToPoints(3)
shp.Height = w.CentimetersToPoints(1)
shp.Left = doc_w - shp.Width
shp.Top = doc_h - shp.Height

Set ss = shp.OLEFormat.Object

ss.Alphabet = CODE128
ss.Text = "123ABCD"
© 2026 StrokeScribe. All rights reserved. Use of any portion of this site constitutes acceptance of our Terms of Use and Privacy Policy. The website material may not be reproduced, except with the prior written permission.