Barcode in 1C:Enterprise 8.2
An example how to put barcodes on a spreadsheet document in 1C:Enterprise 8.2 in managed application mode with StrokeScribe barcode generator.
Preparing a Spreadsheet Document Template
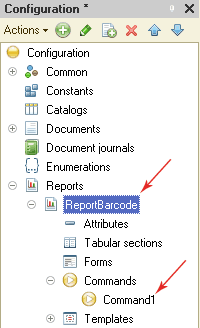
1. In Designer, create a new report. Change the report's name to ReportBarcode (we will use this name in the command module shown below).
2. Create a template with the name TemplateBarcode in the report.
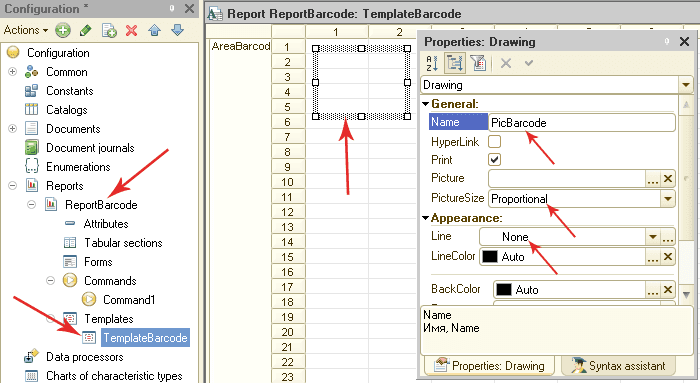
3. In the template, create an Area (select a range of rows and specify a name for the selection in the Properties window) with the name AreaBarcode.
4. Put a picture frame into the area - select Table->Pictures->Picture from the Designer's menu and press OK in the Select Picture dialog. Resize the picture frame with mouse. Do not make it very small - we will fit barcode into this frame. Rename the picture to PicBarcode (right-click the picture, select Properties and change the Name property). Also, set the PictureSize property to Proportional and the Line property to None.
The result must look like as shown on the picture:
The Command Module
Create a new command and paste the following code into the module.
The Code Example
&AtServer
Function DocAtServer()
  Doc = New SpreadsheetDocument;
   //Check you set up the same names for report/template/area in the design
  Template = Reports.ReportBarcode.GetTemplate("TemplateBarcode");
  BarArea = Template.GetArea("AreaBarcode");

  barcode = GetCOMObject("","STROKESCRIBE.StrokeScribeClass.1"); You need to install StrokeScribe on your server

  TempFile=GetTempFileName("wmf"); A temporary file to store barcode images

  barcode.Alphabet=25; //25=QR CODE
  barcode.Text="123ABCD"; //Data to encode in the barcode

  rc=barcode.SavePicture(TempFile, 7, //7=WMF
          100, //Barcode width in TWIPs (1440 per inch)
          100); //Barcode height in TWIPs

  If rc<>0 then //Zero, if a barcode is successfully generated and stored in a file
    Message(String(rc) + " - " + barcode.ErrorDescription);
    return False;
  EndIf;

  pic=BarArea.Drawings.PicBarcode;

  pic.Picture = New Picture(TempFile);//Loading the temporary file content into the picture object

  Doc.Put(BarArea);
  DeleteFiles(TempFile);//We don't need the temporary file anymore
  Return Doc;
EndFunction

&AtClient
Procedure CommandProcessing(CommandParameter, CommandExecuteParameters)
  Doc=DocAtServer();
  If Doc<>False Then
    Doc.Show();
  EndIf;
EndProcedure
To create an area with multiple barcodes, put multiple picture frames into the report's template and call the GetTempFileName(), SavePicture() and =New Picture() for each picture. Please note, you need a separate temporary file for each picture and need to keep these files until the Doc.Put(BarArea) is called. After that, these files can be reused or deleted.
© 2026 StrokeScribe. All rights reserved. Use of any portion of this site constitutes acceptance of our Terms of Use and Privacy Policy. The website material may not be reproduced, except with the prior written permission.